Introduction to Cherry Cheesecake Recipe
Cherry cheesecake isn’t just a dessert—it’s a nostalgic, creamy, sweet slice of comfort. Whether you’re planning a special occasion, craving a weekend treat, or learning to bake from scratch, the cherry cheesecake recipe is a timeless favorite that never fails to please. With its buttery graham cracker crust, rich cream cheese filling, and bright cherry topping, this dessert blends flavor and texture in every bite.
In this ultimate guide, we’ll walk you through every method—from no-bake to old-fashioned, from Philadelphia style to condensed milk versions—so you can choose the cherry cheesecake recipe that best fits your taste and skill level. You’ll also get top troubleshooting tips, expert baking advice, and inspiration for presentation.
Don’t miss our Ultimate Guide to a Perfect Cherry Cheesecake Recipe to compare styles and improve your technique!
Let’s dive into the first essential piece—understanding what makes this dessert so loved and versatile.
Print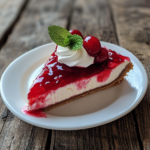
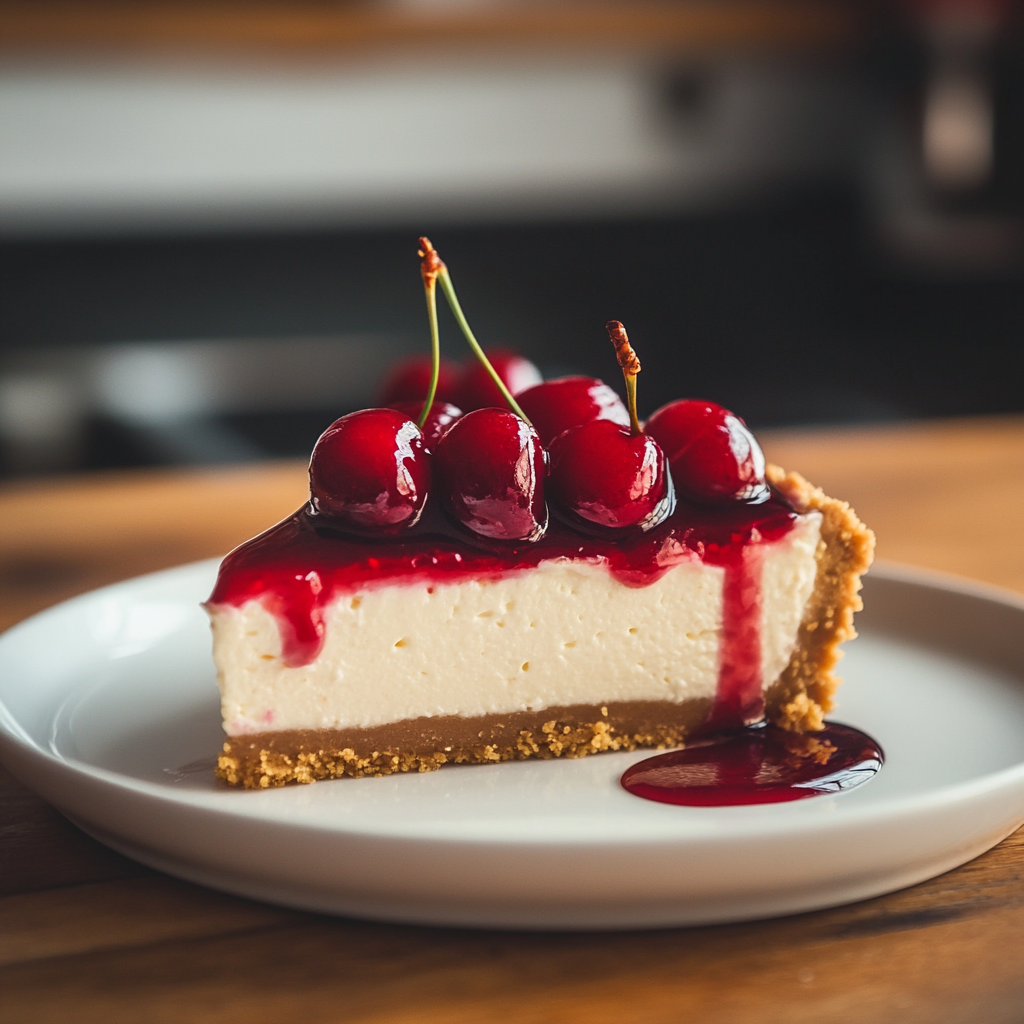
Heavenly Cherry Cheesecake Recipe That’s Surprisingly Easy
- Total Time: 1 hour 20 minutes
- Yield: 12 slices 1x
Description
This heavenly cherry cheesecake recipe features a buttery graham cracker crust, rich Philadelphia cream cheese filling, and a sweet-tart cherry topping. Perfect for special occasions or everyday indulgence, it’s available in both baked and no-bake variations.
Ingredients
For the Crust:
1½ cups graham cracker crumbs
⅓ cup melted butter
2 tbsp sugar
For the Filling:
3 (8 oz) packs Philadelphia cream cheese, softened
1 cup sugar
1 tsp vanilla extract
3 eggs
½ cup sour cream
For the Topping:
1 can cherry pie filling (or 2 cups homemade cherry compote)
Instructions
Preheat oven to 325°F (163°C).
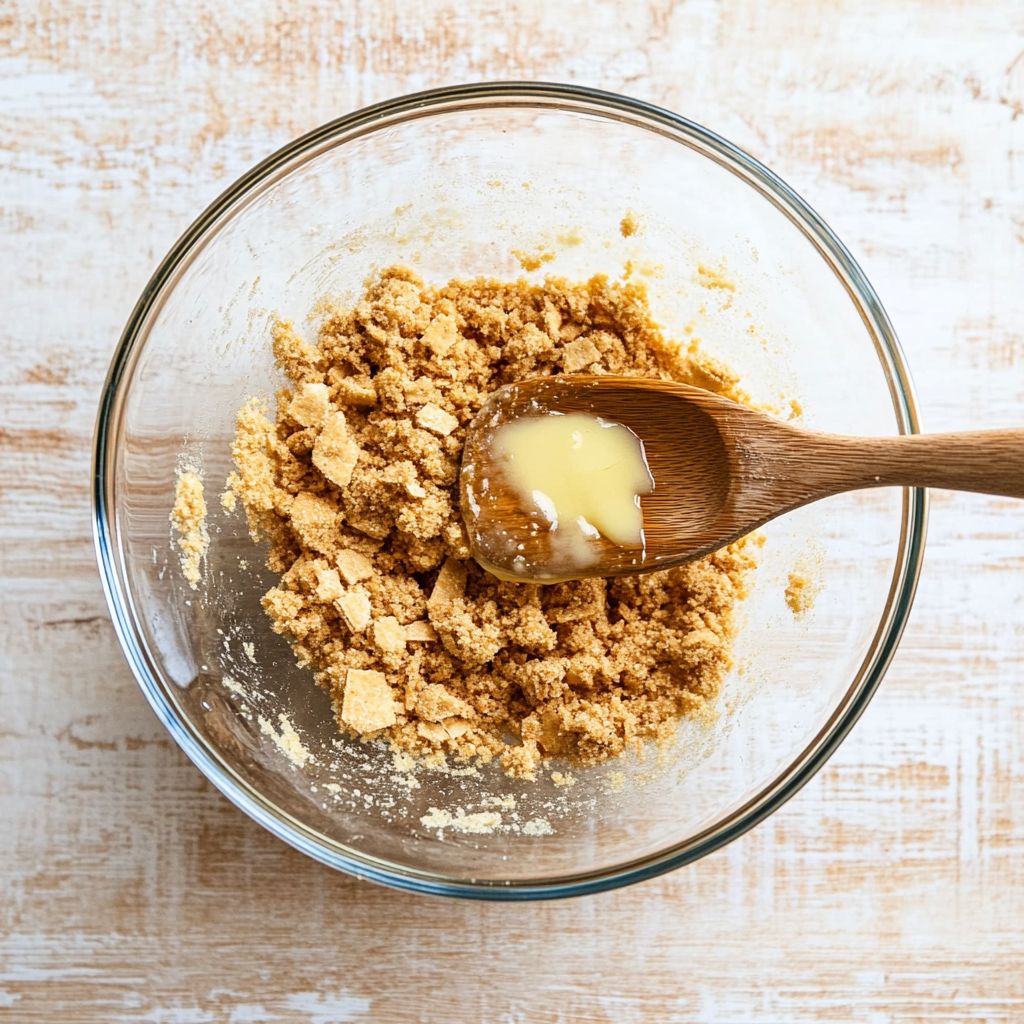
Mix graham cracker crumbs, butter, and sugar. Press into a springform pan. Pre-bake for 10 minutes and let cool.
Beat cream cheese until smooth. Add sugar and vanilla, then mix in eggs one at a time. Stir in sour cream.
Pour filling into crust. Bake 50–60 minutes using a water bath.
Turn off oven, crack door, and let cheesecake cool for 1 hour.
Chill in fridge for 4+ hours or overnight.
Top with cherry pie filling before serving.
Notes
- Use full-fat cream cheese for best texture.
- Let cream cheese come to room temperature before mixing to avoid lumps.
- For a no-bake version, skip eggs and use 1 can sweetened condensed milk + ¼ cup lemon juice. Chill overnight.
- Prep Time: 25 minutes
- Cook Time: 55 minutes
- Category: Dessert
- Method: Baking
- Cuisine: American
Nutrition
- Serving Size: 1 slice
- Calories: 410
- Sugar: 28g
- Sodium: 260mg
- Fat: 28g
- Saturated Fat: 16g
- Unsaturated Fat: 9g
- Carbohydrates: 36g
- Fiber: 1g
- Protein: 6g
- Cholesterol: 110mg
Keywords: cherry cheesecake, Philadelphia cheesecake, baked cheesecake, no-bake cheesecake
What Makes Cherry Cheesecake So Special?
Cherry cheesecake is a dessert that hits all the right notes—rich, creamy, tart, and sweet. It’s popular across generations, often gracing tables during holidays, potlucks, birthdays, and romantic dinners.
The contrast between the silky cheese filling and the fruity cherry topping brings a perfect balance. Add to that a buttery graham cracker base, and you’ve got a dessert that’s both decadent and refreshing.
Plus, it’s incredibly versatile:
- Want something fast? Try a no-bake cherry cheesecake.
- Love deep flavor? A baked old-fashioned cherry cheesecake brings depth.
- Short on time? The easy condensed milk version is your savior.
Whether you’re baking from scratch or assembling quickly, there’s a version for everyone.
A Look at Its Origins and Popularity
Cheesecake itself has ancient origins, tracing back to Greece and Rome. But the cherry-topped version we love today rose to fame in the United States during the mid-20th century. Thanks to brands like Philadelphia Cream Cheese, the cheesecake became a go-to household dessert.
The cherry topping was likely a response to America’s love for sweet-tart fruits and the convenience of canned pie fillings, which hit grocery shelves in the 1940s. It became a staple in diners, home kitchens, and recipe books nationwide.
Today, “Cherry Cheesecake Recipe” gets over 50,000 monthly Google searches—proof of its lasting love affair with dessert fans.
Common Versions You’ll Find Today
Here are the popular versions you’ll learn in this article:
| Version | Description |
|---|---|
| Classic Baked | Dense, smooth, baked with a water bath |
| No-Bake | Lighter, easier, chilled to set |
| Philadelphia Style | Extra creamy using branded cream cheese |
| Old-Fashioned | Made with sour cream and simple ingredients |
| Condensed Milk | No-bake variation with sweetened condensed milk |
| Betty Crocker Style | Boxed crust and mix for convenience |
| Creamy Cheesecake | Ultra-soft texture using whipped additions |
Each offers a unique texture and flavor experience—and we’ll walk you through every detail in the parts to come.
Key Ingredients for the Perfect Cherry Cheesecake
Creating a cherry cheesecake that turns heads and wins hearts starts with choosing the right ingredients. Each layer—from the crust to the creamy filling to the cherry topping—has an important role. Whether you’re going traditional or experimenting with something new, understanding these ingredients is the first step toward perfection.
Classic Base Ingredients and Their Functions
A traditional cherry cheesecake has three layers: the crust, the filling, and the topping. Let’s break it down:
| Ingredient | Layer | Function |
|---|---|---|
| Graham Crackers | Crust | Forms a crunchy base; adds a slightly sweet contrast to the filling |
| Butter | Crust | Binds the crust and provides richness |
| Cream Cheese | Filling | The star of the show—provides the creamy, tangy flavor |
| Sugar | Filling | Balances the tang of the cheese |
| Eggs | Filling | Helps the filling set during baking (not used in no-bake) |
| Vanilla Extract | Filling | Adds depth and aroma |
| Cherry Topping | Topping | Delivers the tart-sweet finish that makes it irresistible |
Using high-quality ingredients enhances flavor and texture—especially the cream cheese and cherries.
Cream Cheese Choices: Philadelphia vs Generic Brands
The cream cheese you choose can make or break your cheesecake. While generic brands might save a buck, they often contain more stabilizers and water, leading to a runnier or rubbery result.
Philadelphia Cream Cheese Benefits:
- Rich, dense, creamy texture
- Smooth blending
- Reliable consistency
Generic Brands Risks:
- Grainy or watery texture
- May separate during mixing
- Can affect overall flavor
Pro Tip: Always use full-fat cream cheese. Low-fat versions often lack the body and richness needed.
Discover great ideas like the Heavenly Cherry Cheesecake Recipe using Philadelphia cream cheese for a velvety finish.
Fresh Cherries vs Canned Pie Filling
The cherry topping is the final touch—and possibly the most visual part of your dessert. You’ve got two main options:
Canned Cherry Pie Filling:
- Super convenient
- Balanced sweetness and tartness
- Glossy appearance for photo-ready presentation
- Shelf-stable and always ready
Homemade Cherry Topping:
- Fresh, bold flavor
- Customizable sugar content
- More rustic look, but gourmet taste
| Feature | Canned Pie Filling | Fresh Cherry Compote |
|---|---|---|
| Flavor | Sweet & subtle | Bright & natural |
| Texture | Syrupy, thick | Chunkier, juicy |
| Prep Time | None | 10–15 minutes |
| Best For | Quick bakes | Gourmet presentation |

Looking for inspiration? Try topping your cheesecake with warm cherry compote and a touch of lemon zest for a bakery-style finish.
Quick Ingredient Substitutions (Table)
| If You Don’t Have… | Try Using… | Result/Note |
|---|---|---|
| Graham Crackers | Digestive biscuits, Oreos | Different flavor, same texture |
| Eggs (for no-bake) | Gelatin or whipped cream | Helps set the filling |
| Sugar | Honey, maple syrup | Adds new flavor note |
| Cream Cheese | Mascarpone (in part) | Softer, slightly sweeter filling |
| Sour Cream | Greek yogurt | Lighter texture, slightly tangy |
Cherry Cheesecake Recipe – The Best Guide to Make It Creamy, Easy & Irresistible
Tools and Prep You Need Before Starting
Before diving into mixing and baking, it’s important to set yourself up for success. Having the right tools on hand—and prepping your ingredients properly—can be the difference between a cheesecake disaster and creamy perfection. Whether you’re making a baked or no-bake cherry cheesecake, here’s what you’ll need.
Kitchen Tools Checklist for Cherry Cheesecake
To keep your kitchen workflow smooth and your cheesecake flawless, here are the essential tools:
| Tool | Why You Need It |
|---|---|
| Springform Pan (9-inch) | Prevents breakage when removing the cake |
| Mixing Bowls | Separate bowls for crust, filling, and topping |
| Hand Mixer or Stand Mixer | Ensures smooth, lump-free filling |
| Spatula | Helps scrape sides and fold ingredients without deflating |
| Measuring Cups & Spoons | Precise measurements = consistent results |
| Food Processor or Ziplock & Rolling Pin | For crushing graham crackers |
| Saucepan (if making homemade topping) | For cherry compote |
| Cooling Rack | Prevents soggy crusts after baking |
| Aluminum Foil & Roasting Pan | Needed for a water bath to avoid cracks in baked versions |
Tip: For no-bake versions, parchment paper at the bottom of the pan makes removal much easier.
Preparing the Crust: Tips for Graham Cracker Base
The crust is the foundation of your cheesecake. It should be firm, buttery, and just sweet enough.
Steps for a Solid Crust:
- Crush your graham crackers finely (use a food processor or rolling pin).
- Mix with melted butter and a tablespoon or two of sugar.
- Press firmly into the bottom of the springform pan. Use a flat-bottom glass to compress it evenly.
- For baked cheesecakes, pre-bake at 350°F for 8–10 minutes.
- For no-bake versions, chill the crust for at least 30 minutes before filling.
Don’t miss our Churro Cheesecake Recipe for a fun twist on a classic crust.
Handling Cream Cheese: Room Temp vs Cold
One of the most overlooked but crucial steps: bringing cream cheese to room temperature before mixing.
| Temperature | Result |
|---|---|
| Room Temp | Blends smoothly, no lumps |
| Cold | Lumpy texture, uneven filling |
Best Practice:
- Let the cream cheese sit on the counter for 45–60 minutes.
- Cut into chunks to speed up softening.
- Don’t microwave—it alters texture unevenly.
Smooth filling = bakery-quality cheesecake. Take the time to soften your cream cheese correctly.
Pro Tip: Line the Pan for Easy Release
To avoid sticking:
- Lightly butter the sides and bottom of your springform pan.
- Use a parchment circle at the base for no-fuss transfer to a serving plate.
With your tools gathered and your ingredients prepped, you’re ready to create the perfect cherry cheesecake.
Classic Baked Cherry Cheesecake Recipe
If you’re looking for a rich, creamy texture with a dense bite and smooth top, the baked cherry cheesecake is your go-to. It’s a bit more involved than no-bake versions, but the reward is a deeply satisfying dessert that feels like it came from a high-end bakery.
Step-by-Step Instructions for Baked Perfection
This recipe yields a classic 9-inch cherry cheesecake that’s ideal for slicing and impressing. Use full-fat cream cheese for the best results.
Ingredients:
| Layer | Ingredients |
|---|---|
| Crust | 1 ½ cups graham cracker crumbs, ⅓ cup melted butter, 2 tbsp sugar |
| Filling | 3 (8 oz) packs cream cheese (room temp), 1 cup sugar, 1 tsp vanilla extract, 3 eggs, ½ cup sour cream |
| Topping | 1 can cherry pie filling or 2 cups homemade cherry compote |
Instructions:
- Preheat oven to 325°F (163°C).
- Prepare crust: Mix crumbs, sugar, and butter. Press into springform pan and pre-bake for 10 minutes. Cool slightly.
- Make filling:
- Beat softened cream cheese until smooth.
- Add sugar, vanilla, and sour cream. Beat until fluffy.
- Add eggs one at a time, mixing just until combined.
- Pour over crust and smooth the top.
- Bake in a water bath: Wrap the springform pan in foil and place in a roasting pan. Fill halfway with hot water.
- Bake for 50–60 minutes or until center is just set.
- Turn off oven, crack the door, and let the cake cool inside for 1 hour.
- Chill in fridge for at least 4 hours or overnight.
- Top with cherries before serving.
Don’t miss our Heavenly Cherry Cheesecake Recipe for a rich twist using extra sour cream and homemade compote.
Temperature Control: Avoiding Cracks
Cracks are the bane of baked cheesecakes—but they’re totally preventable.
| Mistake | What It Causes | How to Fix It |
|---|---|---|
| Overbeating eggs | Air pockets that lead to cracks | Mix just until blended |
| No water bath | Uneven baking and surface cracks | Always use a water bath |
| Sudden temp changes | Collapse and cracks | Let it cool in the oven slowly |
Extra Tip:
- Add a thin sour cream layer before chilling for a glossy, crack-free top.
Water Bath or Not? Pros and Cons
| Method | Pros | Cons |
|---|---|---|
| Water Bath | Even baking, prevents cracks | More setup, risk of leaks |
| Dry Bake | Simpler, faster | Risk of overbaking, cracks more likely |
If you skip the water bath, bake at a lower temp (300°F) and place a tray of water on the bottom oven rack for some added moisture.
Presentation Tip:
Let your cheesecake cool overnight before topping. This helps the cherry topping set beautifully without sinking in.
Check out our Ultimate Cherry Cheesecake Guide for comparison shots of baked vs no-bake texture.

No-Bake Cherry Cheesecake Recipe Variation
No-bake cherry cheesecake is a lifesaver when you’re short on time or don’t want to deal with ovens or water baths. It’s quick to assemble, chilled to perfection, and still delivers that creamy, dreamy bite you expect from a classic cheesecake—without the cracks, stress, or wait.
Why Choose a No-Bake Recipe?
This version is ideal for:
- Hot summer days when turning on the oven feels criminal
- Holiday prep when your oven is already full
- Beginner bakers looking for foolproof dessert wins
- Last-minute entertaining (ready in just a few hours)
The texture is lighter and mousse-like, and while it may not have the same firmness as a baked cheesecake, it still holds beautifully when sliced.
Ingredients Substitutions (Condensed Milk, Whipped Toppings)
A key difference in no-bake recipes is the use of stabilizers and chilled setting instead of eggs and baking.
Classic No-Bake Version with Condensed Milk
| Layer | Ingredients |
|---|---|
| Crust | 1 ½ cups graham cracker crumbs, ⅓ cup melted butter |
| Filling | 2 (8 oz) packs cream cheese, 1 can (14 oz) sweetened condensed milk, 1 tsp vanilla, ¼ cup lemon juice |
| Topping | 1 can cherry pie filling or homemade cherry topping |
Optional Variations:
- Swap sweetened condensed milk for cool whip + sugar
- Add Greek yogurt or mascarpone for extra creaminess
- Stir in lemon zest or almond extract for flavor depth
Looking for inspiration? Try this refreshing Matcha Muffin Recipe for another no-bake dessert pairing.
Setting Time and Fridge Best Practices
No-bake cheesecake relies on chilling, not heat. Here’s how to get it right:
| Step | Tip |
|---|---|
| Chill Time | Minimum 4–6 hours, preferably overnight |
| Wrap Pan | Cover loosely with foil or plastic wrap |
| Avoid Freezer (for setting) | It may set too hard and ruin texture |
| Best Storage | Airtight in fridge for up to 5 days |
Bonus: Kid-Friendly Assembly
Want a fun activity? Make individual cheesecakes in mason jars or cupcake liners. Let kids press the crust and pipe the filling—no oven needed, no waiting for slices.
This version also travels well for picnics or potlucks!
Quick Comparison: Baked vs No-Bake Cherry Cheesecake
| Feature | Baked | No-Bake |
|---|---|---|
| Texture | Dense, creamy | Light, mousse-like |
| Time | 1–2 hours + chill | 20 min + chill |
| Skill Level | Moderate | Beginner-friendly |
| Eggs Required? | Yes | No |
| Baking Required? | Yes | No |
Don’t miss our Ultimate Guide to a Perfect Cherry Cheesecake Recipe for more versions and creative ways to customize both baked and no-bake styles.
Old-Fashioned Cherry Cheesecake Recipe Tips
Sometimes, the best recipes are the ones passed down through generations. The old-fashioned cherry cheesecake is one of those comforting desserts that delivers timeless flavor, a touch of tang, and just the right amount of richness. This version isn’t about shortcuts—it’s about classic methods, simple ingredients, and real baking.
What Makes It “Old-Fashioned”?
The “old-fashioned” label usually means:
- No-fuss ingredients: full-fat cream cheese, sugar, eggs, and sour cream.
- A graham cracker or vanilla wafer crust—no trendy Oreo bases here.
- A baked base with no gimmicks—just slow, even heat and a patient cool down.
- A smooth sour cream topping baked right on the cheesecake for added flavor and texture.
The result? A dense, velvety cheesecake with a hint of tang and a rich cherry topping that tastes like it came straight from grandma’s kitchen.
Traditional Crust vs New-Age Crusts
Old-school recipes rely on the basics, and for good reason. The crust holds everything together and contrasts the creamy filling.
Traditional Crust
- Ingredients: Graham crackers, butter, sugar.
- Texture: Crunchy, with a mild nutty note.
- Flavor: Buttery and slightly sweet.
Modern Alternatives
- Oreo or cookie crusts
- Almond flour or gluten-free options
- Crushed vanilla wafers for a softer finish
If you’re aiming for authenticity, stick to graham crackers or vanilla wafers.
Flavor Enhancers: Lemon Zest, Vanilla Bean, Sour Cream Layers
To elevate an old-fashioned cherry cheesecake without breaking tradition, small additions go a long way.
| Ingredient | Purpose |
|---|---|
| Lemon zest | Brightens the flavor, cuts through the richness |
| Vanilla bean paste | Adds depth and a floral note |
| Sour cream layer | Gives a smooth, tangy contrast to the dense filling |
Classic Sour Cream Topping:
- 1 cup sour cream
- 2 tbsp sugar
- 1 tsp vanilla extract
Spread on top of the cheesecake after it’s mostly baked and return to the oven for 10 minutes. It creates a glossy, luscious layer that perfectly balances the cherry topping.
Bonus Touch: Use Homemade Cherry Sauce
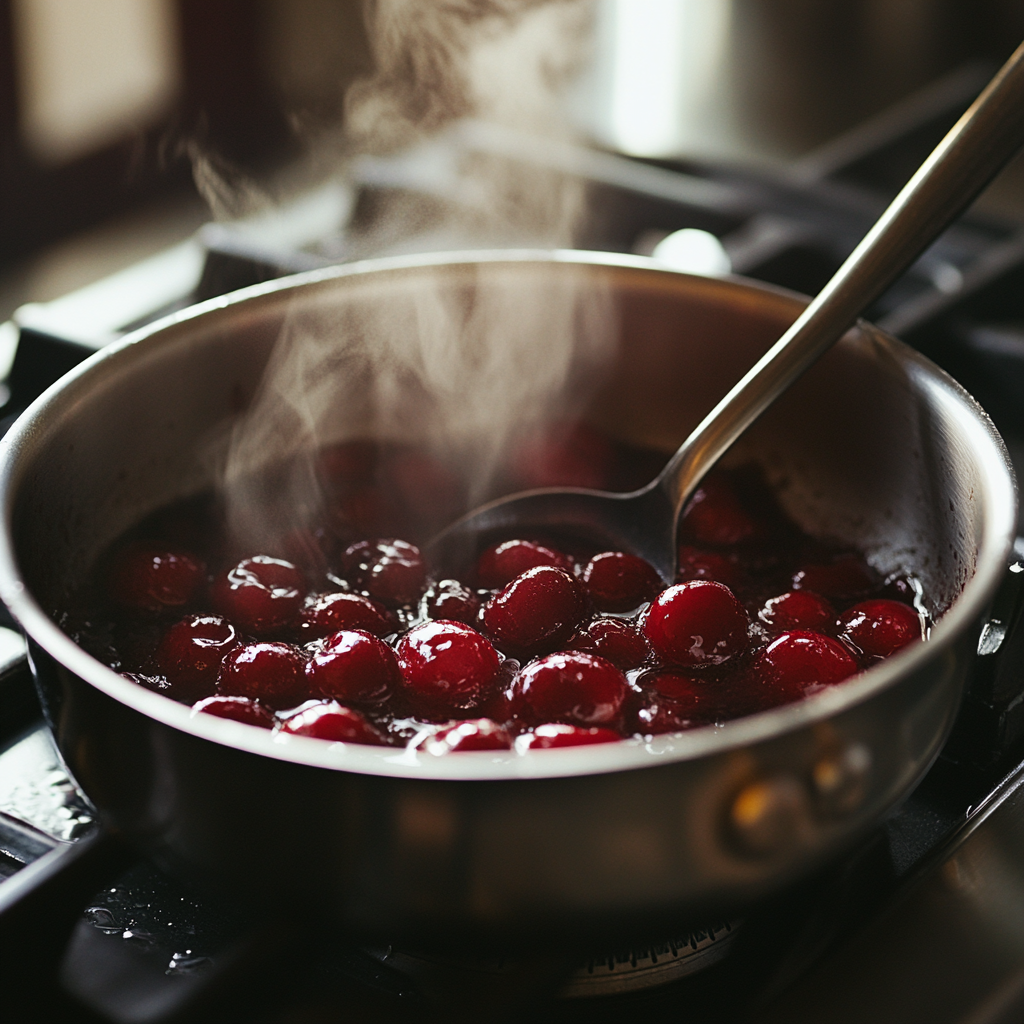
While many old-fashioned recipes use canned pie filling, you can enhance the experience with a quick cherry compote:
Easy Cherry Sauce:
- 2 cups pitted cherries (fresh or frozen)
- ⅓ cup sugar
- 1 tbsp lemon juice
- 1 tbsp cornstarch mixed with 2 tbsp water
Simmer until thick, cool, and spoon over the sour cream layer for unbeatable flavor.
Check out our Churro Cheesecake Recipe for another vintage-style dessert done right.
Philadelphia Cherry Cheesecake Recipe Spotlight
If there’s one name that has become synonymous with creamy, dreamy cheesecake, it’s Philadelphia Cream Cheese. Their classic cherry cheesecake recipe has been beloved for decades. It’s easy to make, super rich, and always reliable—making it a favorite for home bakers and professionals alike.
Why It’s Iconic: Texture and Taste Breakdown
Philadelphia’s recipe became famous because it strikes a perfect balance between ease and indulgence. Here’s why it stands out:
| Feature | Why It Works |
|---|---|
| Ultra-Creamy Texture | Full-fat cream cheese + sour cream = silky smooth finish |
| Tangy-Sweet Flavor | Balanced with just the right amount of vanilla and sugar |
| Foolproof Instructions | Even first-timers can get great results |
| Perfect for Topping | Dense enough to hold cherries without sinking |
The result is a cheesecake that’s dense but not heavy, sweet but not cloying, and stable enough for slicing cleanly.
Following the Original Kraft Recipe
The traditional Philadelphia cherry cheesecake recipe uses simple ingredients and no water bath, which makes it super approachable.
Ingredients:
- 1 ½ cups graham cracker crumbs
- ⅓ cup melted butter
- 3 (8 oz) packages of Philadelphia cream cheese (softened)
- 1 cup sugar
- 1 tsp vanilla extract
- 3 eggs
- 1 can cherry pie filling (or use homemade)
Method:
- Mix crumbs and butter; press into springform pan and pre-bake for 8 minutes at 325°F.
- Beat cream cheese, sugar, and vanilla until smooth.
- Add eggs one at a time, mixing just until blended.
- Pour into crust and bake 50–55 minutes at 325°F.
- Cool gradually, chill overnight.
- Top with cherry filling before serving.
Don’t miss our Ultimate Cherry Cheesecake Recipe that follows this exact blueprint—with a few modern twists.
Toppings That Pair Best with Philly Cheesecake
While cherry topping is the classic, the versatility of the Philadelphia base means you can experiment without sacrificing texture.
| Topping | Flavor Pairing |
|---|---|
| Cherry pie filling | Classic, sweet-tart |
| Strawberries + balsamic | Adds depth |
| Lemon curd | Brightens richness |
| Caramel + pecans | Sweet, salty, nutty |
| Chocolate ganache | Adds decadence |
Pro Tip: Always chill the cheesecake before adding toppings. This prevents sinking and preserves the glossy finish.
Extra Tip: How to Slice Perfectly
- Use a thin, sharp knife.
- Wipe clean between slices.
- Warm the blade in hot water before cutting.
Your slices will look bakery-worthy every time.
Troubleshooting & Expert Cheesecake Tips
Even the most experienced bakers run into issues with cheesecake—cracked tops, runny centers, soggy crusts. But don’t worry! With a few smart tips and fixes, you can rescue most problems or avoid them entirely. Here’s how to make sure your cherry cheesecake comes out bakery-perfect every single time.
How to Fix a Runny Cheesecake
A common issue with no-bake and even some baked versions is a soft or unset center.
Causes of Runny Cheesecake:
| Issue | Solution |
|---|---|
| Didn’t chill long enough | Chill at least 6 hours or overnight |
| Too much liquid in filling | Reduce sour cream or add stabilizer like cornstarch |
| Low-fat cream cheese | Always use full-fat for structure |
| Underbaked (for baked version) | Bake until edges are set but center jiggles slightly |
If your cheesecake is runny after slicing, pop it back in the fridge uncovered for another 3–4 hours. For baked versions, never try to “rebake”—it will curdle.
Why Your Crust Falls Apart
A crumbling crust can ruin a perfect slice. Here’s how to fix it before it ruins your dessert.
| Mistake | Fix |
|---|---|
| Not enough butter | Use ⅓ cup per 1 ½ cups of crumbs |
| Didn’t press it firmly | Use a flat-bottomed glass to pack tightly |
| Skipped chilling (no-bake) | Chill crust for 30+ minutes before adding filling |
| Didn’t pre-bake (baked version) | Always pre-bake for 8–10 mins at 350°F |
Learn more about crust preparation in our Churro Cheesecake Recipe which features a sturdy cinnamon base.
Storing & Freezing Cherry Cheesecake the Right Way
Storing your cheesecake properly ensures it maintains its texture and flavor.
Refrigerating:
- Store in an airtight container or wrap the pan tightly in plastic.
- Lasts up to 5 days in the fridge.
- Always chill before slicing to help it firm up.
Freezing:
- Cool completely, then wrap in plastic + foil.
- Store for up to 2 months.
- For best results, freeze without toppings and add cherries after thawing.
| Step | Freezing Tip |
|---|---|
| Slice before freezing | Easier to thaw individual portions |
| Use parchment paper between slices | Prevents sticking |
| Thaw in fridge overnight | Avoids texture breakdown |
Don’t miss our guide on dessert storage and freezing tips in the Ultimate Cherry Cheesecake Guide.
Pro Tools & Techniques from Expert Bakers
| Tool | Why It Helps |
|---|---|
| Springform Pan | Clean release with no sticking |
| Offset Spatula | Smooths filling and topping |
| Digital Thermometer | Ensures internal temp hits ~150–155°F when baked |
Customizations, Toppings & Serving Ideas
Whether you’re baking for a birthday, a casual dinner, or a festive gathering, there are endless ways to elevate your cherry cheesecake recipe. From creative toppings to unique crusts and presentation tricks, this section will help you personalize your dessert while keeping that creamy cherry goodness front and center.
Cherry Compote vs Pie Filling vs Fresh Fruit
The topping is what people see first—and often what they remember. Here’s how to make yours pop:
| Topping Type | Flavor | Look | Best Use |
|---|---|---|---|
| Canned Pie Filling | Sweet, syrupy | Glossy, uniform | Classic look, fastest option |
| Homemade Cherry Compote | Bright, tangy | Rustic, juicy | Gourmet feel, elevated flavor |
| Fresh Cherries | Tart, bold | Raw and colorful | Summer parties, fresh texture |
Quick Compote Recipe:
Simmer 2 cups of pitted cherries with ⅓ cup sugar and 1 tbsp lemon juice until thickened. Cool completely before using.
Want something unique? Add a splash of kirsch or amaretto to your compote.
How to Add Chocolate Swirls or Oreo Crusts
If you’re a fan of rich flavors, chocolate and cherry make a bold pairing. Here are two easy twists:
Chocolate Swirl Cherry Cheesecake:
- Melt 3 oz of semisweet chocolate.
- Pour half the batter in the crust, drizzle chocolate, swirl with a skewer, and top with remaining batter.
Oreo Crust Variation:
- Swap graham crackers for crushed Oreos (about 22 cookies with filling).
- Reduce sugar in the crust, since Oreos are sweet.
This twist is perfect for chocolate lovers or when you want to give the cheesecake a modern edge.
Creative Plating Tips for Parties and Holidays
Your cherry cheesecake doesn’t just have to taste amazing—it can look stunning, too.
| Occasion | Plating Idea |
|---|---|
| Valentine’s Day | Heart-shaped mini cheesecakes, cherry heart toppers |
| Thanksgiving | Add a drizzle of spiced cranberry sauce on top |
| Summer BBQ | Use fresh cherries and mint sprigs for a refreshing look |
| Birthday | Pipe whipped cream rosettes around the edge, top with candles |
| Potlucks | Make mini cheesecake cups or cheesecake bars for easy serving |
Tip: Use a warm knife and clean it between each slice for that perfect bakery-style cut.
Cheesecake Bar Toppings Station (for Parties)
Offer a DIY topping bar with:
- Cherry compote
- Crushed Oreos
- Chocolate chips
- Whipped cream
- Toasted almonds
It’s interactive, fun, and customizable for every guest.
To take your cherry cheesecake to the next level, having the right tools in your kitchen makes all the difference. For perfectly smooth, lump-free batter, consider using the KitchenAid 5-Speed Ultra Power Hand Mixer—a reliable choice for both novice and seasoned bakers. To ensure even baking and flawless release, a quality pan like the Nordic Ware 9-Inch Springform Pan is a must-have. And if you want your cherry topping to look picture-perfect, the Wilton Decorator Pro Piping Tool will help you add elegant whipped cream swirls or chocolate drizzle with precision. These tools not only improve your results but also make the baking process easier and more enjoyable.
FAQs About Cherry Cheesecake Recipe
How do you make a Philadelphia cherry cheesecake?
To make a Philadelphia cherry cheesecake, start with a graham cracker crust and bake it for 10 minutes. Mix three packages of softened Philadelphia cream cheese with sugar, vanilla, and eggs until smooth. Pour it into the crust and bake at 325°F for 50–55 minutes. Let it cool and chill for at least 4 hours before topping with cherry pie filling. This version is creamy, rich, and foolproof—just like the classic Kraft recipe.
What is the difference between baked and no-bake cherry cheesecake
The main difference lies in texture and preparation. Baked cheesecake is dense, firm, and rich, requiring eggs and oven time. It has a custard-like consistency. No-bake cheesecake is lighter, fluffier, and uses whipped cream or condensed milk to set in the fridge. It’s faster and great for warm weather or when you want to avoid baking.
Can I use condensed milk in my cherry cheesecake?
Absolutely! Sweetened condensed milk is a popular ingredient in no-bake cherry cheesecake recipes. It provides sweetness and structure without needing eggs. Simply blend it with cream cheese, lemon juice, and vanilla, then chill until firm. It’s perfect for quick, creamy results with minimal effort.
What makes a cherry cheesecake old-fashioned?
An old-fashioned cherry cheesecake sticks to the basics: a graham cracker crust, full-fat cream cheese, sugar, eggs, and often a sour cream topping. It’s typically baked, not chilled, and avoids modern additions like whipped toppings or flavored crusts. The flavor is nostalgic, rich, and slightly tangy—just like grandma used to make.
How do you make cherry cheesecake creamy?
To get an ultra-creamy texture:
- Use room temperature full-fat cream cheese.
- Avoid overbeating the eggs (which can introduce air).
- Incorporate sour cream or mascarpone into the filling.
- Bake using a water bath and cool the cheesecake slowly.
- Chill overnight before serving.
These steps ensure a smooth, luscious cheesecake that melts in your mouth.
Is Betty Crocker cherry cheesecake good?
Betty Crocker’s boxed cherry cheesecake kits offer a convenient and quick option. They include a crust mix and filling mix, often requiring just milk and butter. While they won’t match the depth of a homemade cheesecake, they’re a solid solution for beginner bakers or last-minute desserts. You can always upgrade it with real cherries and whipped cream.